Plug-ins are a powerful way to extend and customize Dynamics 365 (Dataverse) by injecting custom logic into the standard event pipeline. Whether you’re validating data on record creation or orchestrating complex business logic during updates, plugins allow you to go beyond out-of-the-box functionality. This article covers the essential steps to create a plugin in Visual Studio, how to deploy it, and best practices for error handling and logging.
This article targets mainly a technical audience, unless you want to read to get a general idea.
Key Events for Triggering Plugins in Dynamics 365
Before we can discuss the set up, an quick overview of the main events on which you can attach your plugins.
- Create: When a record is created.
- Update: When a record is updated.
- Delete: When a record is deleted.
- Retrieve: When a record is retrieved (read).
- RetrieveMultiple: When a query returns multiple records
Specific events include assign, merge, SetState, Close, and QualifyLead, which are less frequent. Other events involve sharing, security, relationships like associate, and custom events created within the platform. More information on Microsoft learn
The event execution pipeline in Microsoft Dataverse breaks down message processing into four distinct phases, allowing developers to insert custom code at specific points in the lifecycle of an operation. Event execution pipeline phases :
1. PreValidation : Pre-validation occurs before execution, allowing cancellation before security checks.
2. PreOperation : Pre-operation allows entity value changes but canceling risks rollback issues.
3. MainOperation : The main operation is internal but allows custom virtual table data and API interventions.
4. PostOperation : Post-operation modifies messages and registers async steps after execution.
The choice of the execution phase depends directly on the purpose of the extension. If an exception is thrown by the code in a synchronous phase within the transaction, it will cause a complete rollback of the transaction. To rollback an operation, it is recommended to intervene during the pre-commit phase by throwing an 2. PreOperation : Pre-operation allows entity value changes but canceling risks rollback issues.
3. MainOperation : The main operation is internal but allows custom virtual table data and API interventions.
4. PostOperation : Post-operation modifies messages and registers async steps after execution.
InvalidPluginExecutionException exception accompanied by an explanatory message. More information on Microsoft documentation).
1. Setting Up Your Development Environment
Let's now focus on the requirements for creating a plugin.
To set up your dev environment, follow the steps below :
1. Install Visual Studio
2. Set Up Your Project
3. Folder and Namespace Organization
- Use Visual Studio (Community, Professional, or Enterprise), not Visual Studio Code.
- You will need to install the Dynamics 365 Developer Toolkit or the Dynamics 365 SDK Tools separately (though the original toolkit is now deprecated, various community-driven versions are available).
2. Set Up Your Project
- Create a new Class Library (.NET Framework) project in Visual Studio.
- Add references to the necessary Dataverse assemblies, e.g.,
Microsoft.Xrm.SdkandMicrosoft.Crm.Sdk.Proxy.
3. Folder and Namespace Organization
- Keep your plugin classes within a logical folder structure (e.g.,
Plugins/) and use consistentnamespaceconventions to avoid confusion.
2. Sample Plugin Template
Below is a basic template for a Dynamics 365 plugin using C#.
This example triggers on the creation of a Contact record. It checks if the "description" field is empty and automatically fills it with a default value if necessary.
using System;
using Microsoft.Xrm.Sdk;
namespace MyDynamicsPlugins
{
public class CreateContactPlugin : IPlugin
{
public void Execute(IServiceProvider serviceProvider)
{
// Obtain the tracing service
ITracingService tracingService = (ITracingService)serviceProvider.GetService(typeof(ITracingService));
// Obtain the plugin execution context
IPluginExecutionContext context = (IPluginExecutionContext)serviceProvider.GetService(typeof(IPluginExecutionContext));
// Obtain the organization service reference
IOrganizationServiceFactory serviceFactory = (IOrganizationServiceFactory)serviceProvider.GetService(typeof(IOrganizationServiceFactory));
IOrganizationService orgService = serviceFactory.CreateOrganizationService(context.UserId);
try
{
tracingService.Trace("CreateContactPlugin: Execution started...");
// Check if the plugin is triggered by 'Create' message
if (context.MessageName == "Create" && context.InputParameters.Contains("Target"))
{
// 'Target' is the entity to be created
Entity entity = (Entity)context.InputParameters["Target"];
// Make sure it's a Contact entity
if (entity.LogicalName == "contact")
{
// Implement your custom logic here
tracingService.Trace("CreateContactPlugin: Processing contact creation.");
// Example: Check if 'description' field is empty
if (!entity.Contains("description") || string.IsNullOrWhiteSpace(entity["description"].ToString()))
{
entity["description"] = "Auto-filled description by plugin";
tracingService.Trace("CreateContactPlugin: Description field auto-filled.");
}
}
}
tracingService.Trace("CreateContactPlugin: Execution completed successfully.");
}
catch (Exception ex)
{
// Trace the error
tracingService.Trace("CreateContactPlugin: {0}", ex.ToString());
// Raise an exception so it appears in the user interface or logs
throw new InvalidPluginExecutionException("An error occurred in the CreateContactPlugin.", ex);
}
}
}
}
3. Building and Packaging the DLL
Follow the steps below :
1. Configure Assembly Properties
- Go to Project → Properties and ensure the assembly name and default namespace match your preference.
- (Optional) Sign the assembly with a strong name in the Signing tab.
2. Build the Project
- Select Release mode (though Debug works too for testing).
- Right-click your project in Solution Explorer and choose Build or Rebuild.
- A
.dllfile is generated inside thebin/Releasefolder of your project.
3. Validate Dependencies
- Ensure the final DLL references the correct version of the
Microsoft.Xrm.Sdkassemblies (which typically matches your online or on-premise instance).
4. Importing the Plugin into Dynamics 365 (Cloud)
1. Use the Plugin Registration Tool
- Launch the Plugin Registration Tool (provided within the CRM SDK Tools).
- Connect to your Dynamics 365 instance (use OAuth or another supported authentication method).
- Click Register → Register New Assembly.
- Browse to your .dll file.
- Choose Database as the storage location (recommended for Dynamics 365 Online).
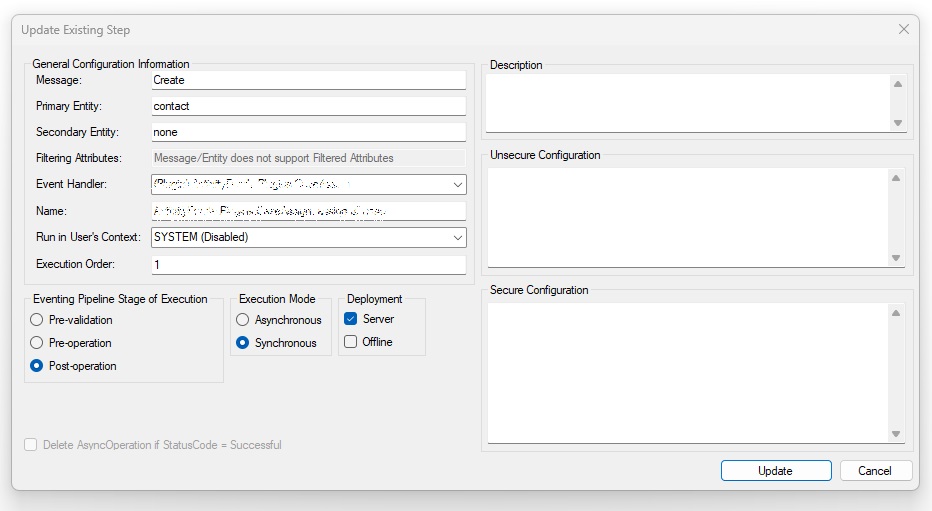
- Once the assembly is registered, expand it in the tool and Register New Step.
- Specify Message (e.g., Create), Primary Entity (e.g., contact), and the appropriate.
- Adjust Filtering Attributes if you only want the plugin to fire for certain fields.
- After registration, perform the action (e.g., create a new contact) in Dynamics 365.
- Verify that your plugin logic executes as expected.

5. Error Handling and Logging
Logging is essential when developing plugins. If the code does not perform as expected, certain operations may fail. This is why using the
tracingService is crucial. Messages logged through this service are captured in the Plugin Trace logs. Here's how to enable it.A. Enabling Logs in the Environment
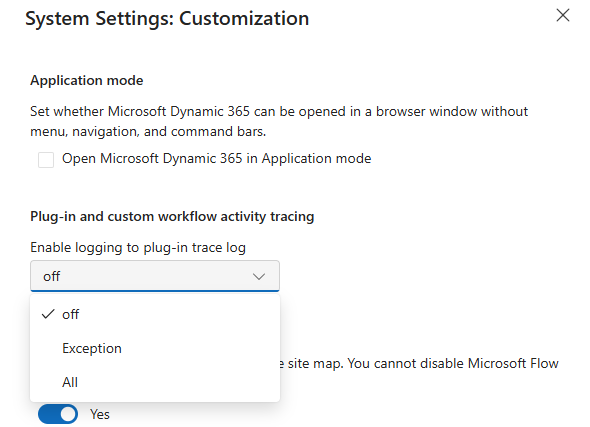
To enable Plugin Trace Logs in Dynamics 365, click on the settings icon ⚙️ at the top right of the screen and select Advanced Settings.
Once in the advanced settings, go to System → Administration, then click on Customization.
In the system settings window, go to the Customization tab and find the Enable Plugin Trace and Custom Activity Logging option. Change this option to Yes to enable it. After enabling this feature, choose the logging level under Plugin Trace Log Level. You can select Exception or All to save.

This log captures
tracingService.Trace() calls. Administrators can then view the output under Settings → System Jobs → Plugin Trace Log.Note: For performance reasons, it’s usually recommended to disable or limit logs in production. Excessive logging can increase storage usage and affect performance.
B. Importance of
try-catch for Critical Operations- Wrapping your critical operations in
try-catchblocks allows you to catch and log exceptions. - Use
ITracingServiceto output relevant traces for debugging. - Re-throwing exceptions using
throw new InvalidPluginExecutionException()surfaces errors to the Dynamics UI or logs, making it easier for administrators to identify issues quickly.
6. Best Practices Recap
1. Keep Plugins Focused Each plugin step should handle a single responsibility. Complex logic can be split into multiple steps or secondary flows (e.g., Azure Functions or Power Automate).
2. Leverage the Tracing Service Always trace start and end of critical operations, plus relevant variable values. This is invaluable for debugging.
3. Handle Exceptions Gracefully The
try-catch approach ensures errors are logged. You can also re-throw them or handle them silently, depending on your scenario.4. Limit Log Levels in Production Generate minimal logs in production to avoid performance hits, but keep them verbose enough to troubleshoot critical issues.
5. Maintain Version Control Store your plugin project in a source control system (e.g., Git) to track changes and collaborate effectively.
Conclusion
Dynamics 365 plugins allow you to inject custom business logic at key points in the data processing pipeline, offering significant flexibility in how you control data and processes. By using Visual Studio, following a clean code architecture, and implementing robust error handling via
try-catch and the ITracingService, you ensure your plugins are both reliable and maintainable. Remember to carefully manage logging—especially in production—to keep performance high while still capturing essential diagnostic information. With these best practices in mind, you’ll be well on your way to delivering high-quality, enterprise-grade extensions in Dynamics 365.


 Français
 English